If you've ever wanted to try chip carving, then you've probably noticed that it can be a challenging task. There are many techniques and styles that you could try. But which one should you choose? What tools will you need? I will be sharing my tips and tricks for carving chips. There are many key ingredients to successful chip carving, no matter how traditional your style.
Traditional
Chip carving can be considered one of the oldest forms in decorative woodcarving. This requires a straight-edged or offset knife. Chip carving is a technique that involves making small, triangular incisions into wood in order to create a pattern. This art form began over 1,000 years ago and evolved simultaneously in many different lands. The designs are often so similar that it was difficult to distinguish between them because of their popularity.
As wood carving became more common, skills were passed on from generation to generation. Chip carving was used in Sweden to decorate furniture. Schools were eventually established to teach this art. Modern chip carvers benefit from centuries of experience and the skills of carvers. Over the years, knowledge and experience was passed from apprentice to student. It is a long-lasting process that continues today.
Free form
You've come to right place if you've ever wanted to learn chip carving. Murray Taylor has created a DVD that shows you how create both freeform and geometric carvings. This DVD is a great introductory project that provides lots of information. English and NTSC formats are also available. The DVD can be purchased in stereo or widescreen. Artisan Media Ltd. is the owner of DVD. It is also available in MP4 format for Windows or Mac computers.
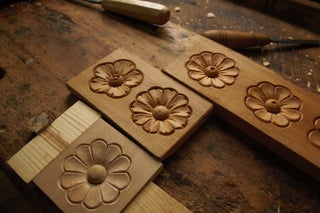
The basic shapes in geometric chip carving are triangles, circles, and lines. This technique allows for endless shapes and patterns, and can also be used to combine various styles. This style of chip carving is also referred to as free form chip carving. You can make your chips look beautiful in any room, no matter whether they are a flower, a dragon or a tree. It is possible to combine many techniques in one piece using free form chip carving.
Techniques
Since centuries, chip carving has been a popular art form. These examples can be found all around the world. You can find chip carving on boats paddles and other ceremonial tools handles in the South Pacific Islands. The carvings were likely made using pieces of bone and seashells, although some people also used shark teeth. This book shows you how to create beautiful designs with a variety of chip-carving techniques.
If you're familiar with a few basic techniques, chip carving is very simple. The first step is to learn how you can carve the fine triangle. This pattern is easy to understand and easy to execute. This pattern is easy to carve. You simply need to cut various triangles, and then repeat the process. However, chip carving doesn't have be boring. Variation of the triangles can give you a wide variety of patterns.
Tools
Lora S. Irish will provide a free online seminar on chip carving. You will learn how to use various tools and supplies for carving, such as a chip knife and stab knife. Irish will also cover the various types of wood carving tools in this free seminar. You can choose from the list below to purchase the right tool for your carving needs. These tools can be used to create simple designs and shapes, or more complex designs.
A chip carving knife employs special geometry. It measures approximately one-half inches in length and has a narrow, curved edge at the back. This allows for precise incisions. You should also choose a point that is sharp and needle-sharp so that the edges meet perfectly. The chip carving knives are made from stainless steel with a sharp tip. A chip carving knife should be sharp and sharp enough to slice a bit of wood.
Getting started
You must learn the basics of chip carving before you start. This process varies based on the type of carving that you intend to do. To make your work as accurate and precise as possible, it is important that you are familiar with these basic principles. Chip carving is a technique that involves creating a fine pattern in wood. Follow these steps to create your very first chip carve.
When using a chip carving knife, it is essential to sharpen it well. A chip carving knife's blade will have bevels at each end. This indicates that it is primary. The sharpening tool is shaped like a small diamond and can produce sharp edges. Place the stone at a 10 degree angle. The stone will both sharpen and shave the chip carving knives and tool simultaneously.
FAQ
How can I learn basic woodworking skills
It is an excellent way to learn how to build furniture. You can make a simple bench yourself. This project can be done with any kind of wood that you have at home. If you're not sure which kind of wood to choose, you can purchase cheap pine boards at Lowes and Home Depot. After building your bench, sand off any rough edges and apply a stain or varnish.
How do I choose the right tools for me?
It helps to reflect on your needs and preferences before you shop for tools. Do you prefer metal or plastic handles? What size nails and screws do you usually use? Do you prefer hand tools over power tools?
Is it possible to refinish your own furniture?
Yes! There are many different ways to refinish older furniture without the need for professional help. Here are some examples:
Use sandpaper for removing stains and scratches. Next, wipe the surface clean with a damp cloth.
Apply clear polyurethane finish. Allow furniture to dry completely before you move it around.
Use acrylic paint to paint furniture.
Instead of using paint, stain is a better choice. You can give your furniture a rich appearance with stain.
Shellac wax is applied. You can protect your wood with wax and give it shine.
Where can I find my woodworking tools?
You can find everything you need in many places. You could also visit hardware stores in your area or shop online at Amazon.com.
You can also check garage sales and flea markets for old furniture and other materials you can reuse.
Which woods are good to use for furniture-making?
Woods are classified based on their hardness. Softwoods include cedar, pine, cedar, and Cypress. They are great for outdoor furniture as they resist rot. The hardwoods are oak, maple and mahogany. They can't withstand the elements outside so they're best kept indoors.
Statistics
- In 2014, there were just over 237,000 jobs for all woodworkers, with other wood product manufacturing employing 23 percent; wood kitchen cabinets and countertop manufacturing employing 21 percent. (theartcareerproject.com)
- If your lumber isn't as dry as you would like when you purchase it (over 22% in Glen Huey's opinion…probably over 10-15% in my opinion), then it's a good idea to let it acclimate to your workshop for a couple of weeks. (woodandshop.com)
- Most woodworkers agree that lumber moisture needs to be under 10% for building furniture. (woodandshop.com)
- Woodworkers on the lower end of that spectrum, the bottom 10% to be exact, make roughly $24,000 a year, while the top 10% makes $108,000. (zippia.com)
External Links
How To
Tips for driving a nail in wood
To drive a nail into wood, the first step is to select the right size and type hammer. The most popular types of hammers include claw hammers as well as mallets and ball peenhammers. Each type of hammer comes with its advantages and disadvantages. For example, a claw hammer works best when you want to hit something hard, like nails; however, it's difficult to control precisely where the blow lands. A sledgehammer is useful for striking large areas at once but too heavy to be effective for smaller tasks.
After selecting the right hammer, you will need to place your hand flat against one side of the head. The handle should rest comfortably in your hands. Hold the handle in your hand, but don’t force it too hard that you break. You should hold the hammer straight-up, with your wrist still relaxed. You should then swing the hammer straight up, keeping your wrist relaxed. The impact of the hammer hitting the nail should be felt. Try swinging a hammer using a block wood to practice until you are comfortable.
The hammer should be held close to your body when you are ready to begin driving the nail. Position the nail, so it's perpendicular to the surface of the wood. Keep your eyes on the tip. Move the hammer forward and then continue to move the hammerhead. Continue this motion several times, slowly increasing the speed of each swing. When you are confident with the technique, add power to your swings. You can hold the hammer over your shoulder and forcefully bring it down. This will allow you to exert more energy.
Once you have successfully drilled the first hole in the nail, remove the hammer. You can then remove the rest of the nails using a prybar or a screwdriver. You should ensure that the nails are flush with the board's surface to avoid splitting the wood.